How to Create & Manage a Salesforce Pipeline (2024)
Learning how to build and manage a high-functioning Salesforce pipeline can get complex really quickly.
Salesforce's features are endless.
The official documentation is dense and disjointed.
Piecing together information from Salesforce communities and forums can get overwhelming.
Fortunately, we have a solution.
In this article, we’ll show you how to build a Salesforce pipeline from scratch and manage it like a pro. We’ll also introduce you to an innovative Salesforce add-on to get your pipeline thriving.
A sales pipeline maps your sales stages and tracks the opportunities moving within each stage in real time.
But in today's data-driven world, you need next-gen vision.
This is where a dedicated CRM like Salesforce comes in.
At its core, a Salesforce pipeline isn't just any sales pipeline; it's a finely tuned tool crafted within the Salesforce CRM ecosystem.
By leveraging specialized Salesforce services, tools, features, and add-ons, you can transform the traditional sales pipeline into a more efficient, Salesforce-empowered process.
But remember: the creation and management of your Salesforce pipeline is a team effort. Sales managers are at the forefront, working hand-in-hand with sales ops, marketing, CRM admins, and top-level management.
Let’s delve deeper into how you can get the Salesforce pipeline up and running.
Step 1: Identify Your Sales Stages
Before you start to tinker with Salesforce, you’ll first need to draw a roadmap of your customer journey.
In other words, you’ll need to chalk out your sales pipeline stages to mirror your sales funnel and map them in Salesforce, ensuring a cohesive and effective sales process.
Let’s examine the seven standard sales pipeline stages:
Lead Generation: Identify potential customers and reach out to them through different marketing channels.
Qualifying Leads: Sift through your leads, figuring out who's really a good fit. In other words, narrow down prospects from a list of leads.
Needs Analysis: During this phase, dive deep into understanding what your prospects need and how you can help.
Proposals: Present your product or service in a way that perfectly aligns with their needs.
Negotiations: At this stage, discuss terms with your prospect and tweak terms to suit both parties.
Closed Won/Lost: The two possible outcomes after all the work you put in. 'Closed Won' is when the deal is successfully signed, or 'Closed Lost' if it doesn't go through.
Post-Sale/Account Management: The sale has been made, and now the focus shifts to customer success. It's all about keeping the customer happy, addressing their ongoing needs, and laying the groundwork for future business.
If these stages are already set, why bother customizing them?
As we mentioned, these are standard stages.
But every business is unique, so you need the flexibility to skip, modify, or merge certain stages (and their sub-stages) based on your company's specific sales strategy, product complexity, and customer base.
Here’s an example:
For an Enterprise SaaS business, these stages might look like: Identifying key industry players, qualifying based on tech needs, detailed product demos, tailored solution proposals, contract negotiations, and account management for upselling.
Once you’ve figured out your sales stages, map them to Salesforce. In Salesforce, these stages are referred to as "Opportunity Stages."
Note: Salesforce offers two distinct versions: Classic and Lightning.
While they share many core functionalities, the approach to configuring features like Opportunity stages can vary between these two versions.
Salesforce has been gradually transitioning users to the Lightning Experience, known for its modern and intuitive interface.
And while they’re yet to give a sunset date for Salesforce Classic as of December 2023, they discontinued the Classic Mobile app in 2017.
As a result, for this guide, we're zeroing in on the Salesforce Lightning Experience.
Step 2: Shape Your Opportunity Stages in Salesforce
Follow these steps to create Opportunity stages in Salesforce:
Access Salesforce Setup
Click on the gear icon in Salesforce and select 'Setup.'
Navigate to the Opportunity Object
Click on the 'Object Manager' tab.
Find and select 'Opportunity' from the list of objects.
Modify the Stage Field
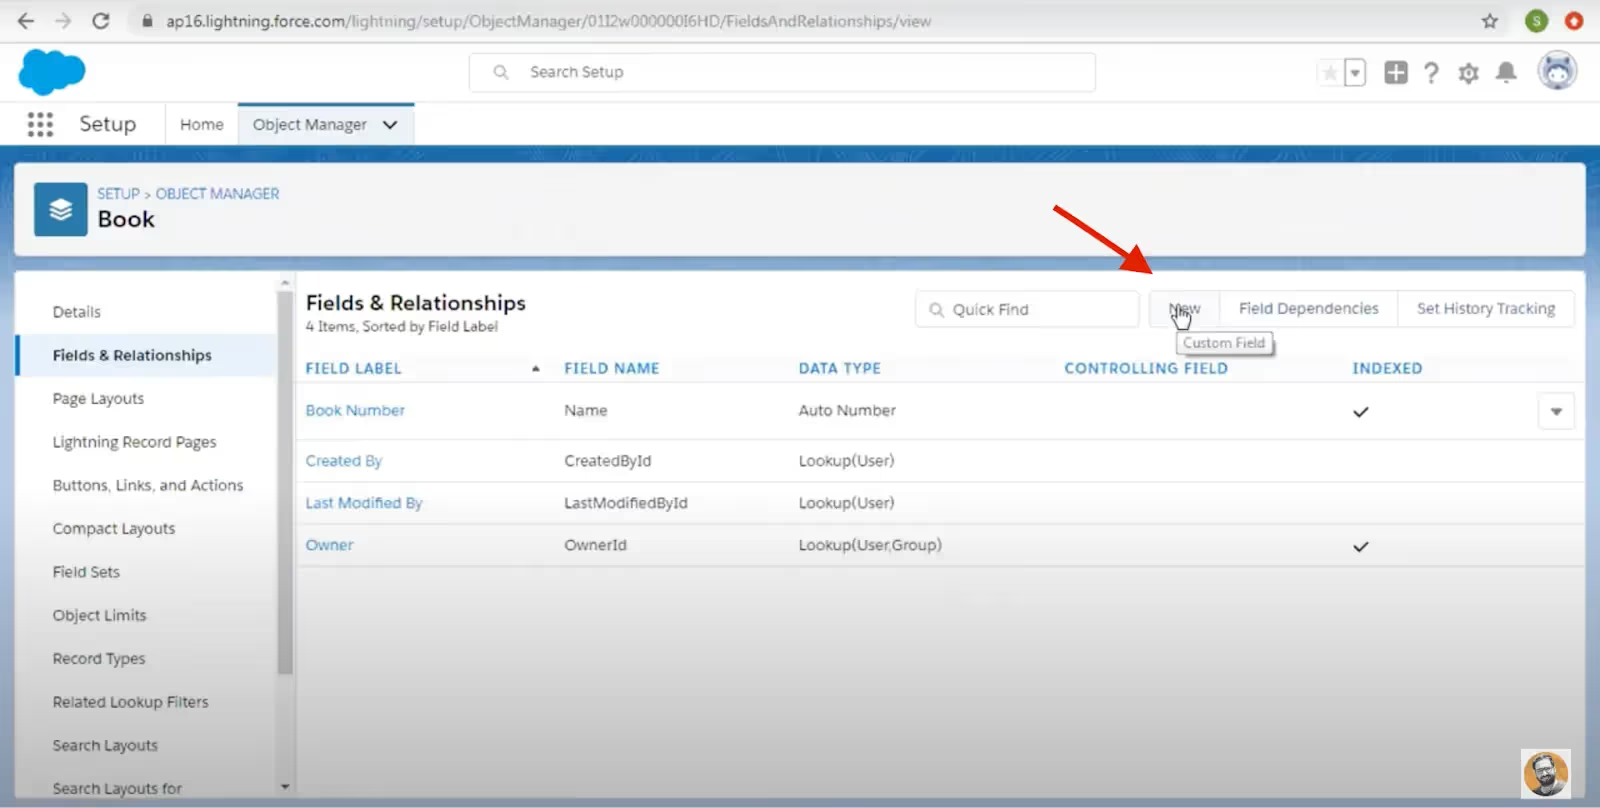
Within the Opportunity object, go to 'Fields & Relationships'.
Click on the 'Stage' field to modify it.
Add New Opportunity Stages
Click 'New' to add a new stage.
Fill in the details for your new stage, such as:
Stage Name (e.g., 'Application Received')
Type (e.g., 'Open')
Probability (e.g., 30%)
Forecast Category (e.g., 'Pipeline')
Description (e.g., 'Our organization has been notified that the grant application was received')
Save your new stage.
Create or Modify a Sales Process
In Setup, use the Quick Find box to search for 'Sales Processes'.
Select 'Sales Processes' and click 'New'.
Choose an existing Sales Process as a base or start with the 'Master'.
Enter a name and description for your new Sales Process.
On the Opportunity Stage screen, select the stages you want to associate with your new Sales Process.
Save your new Sales Process.
What's a ‘Sales Process’ in Salesforce?
Think of your Salesforce Sales Process as the map guiding your deals from prospect to closed won, with Opportunity Stages as the milestones along the journey. For example, if you offer both tangible products and services, you can have distinct Sales Processes for each.
Assign Stages to Record Types
If your organization uses multiple record types for opportunities, ensure that each record type is associated with the correct Sales Process.
This step ensures that the relevant stages are available for each type of opportunity (e.g., Product, Service).
Review and Test Your Configuration
After setting up your stages, create test opportunities to ensure that the stages appear correctly and function as intended.
This step is crucial for verifying that your setup aligns with your business's sales workflow.
Repeat the above steps (#1 - #6) for each new Opportunity Stage you want to add.
Step 3: Craft Custom Fields for Capturing Insights
While well-structured sales processes and opportunity stages lay a solid foundation, it's the insights you gather that truly drive success.
This is where custom fields come in, acting as powerful tools to capture critical information and empower your sales team to close deals faster and smarter.
Here’s how to go about creating custom fields:
A. Assess Your Business Needs: Understand what information is vital for your sales process. Think about the insights that will truly make a difference in closing deals.
B. Review Default Fields: Salesforce has several standard fields, but they might not cover all your bases. Take a good look at them to identify any gaps.
C. Plan Custom Fields: Account for your overall sales approach when planning custom fields. For instance, if you follow the MEDDIC framework, you can enhance your Salesforce setup by creating custom fields aligned with this methodology.
For instance, add a field to capture 'Decision Criteria', detailing what factors your prospects consider most important in a purchasing decision. Similarly, a field for 'Economic Buyer' can help identify the key decision-makers in the buying process.
D. Create Custom Fields: Head to the Object Manager, select your Opportunity object, and then Fields and Relationships. Click on ‘New’ to add new fields.
These could be text fields, picklists, or date fields.
E. Set Up Validation Rules: If certain information is critical, use validation rules to ensure data is entered before an opportunity can progress.
An example?
For a SaaS business, understanding the prospect's current software usage or readiness for implementation can be crucial.
Tip: You can create custom fields in many standard objects besides the Opportunity object. Users can also create entirely new custom objects to represent data specific to their business that doesn't fit into the standard Salesforce objects provided.
F. Test Custom Fields: Implement these newly created fields focusing on necessity. Avoid overloading your team with unnecessary data collection. Test these fields to ensure they add value and don't hinder the sales process.
Step 4: Start Adding Opportunities to the Pipeline
Now that your Salesforce pipeline is ready to go, it’s time to fill your pipeline with opportunities.
Adding them is a breeze:
In the Salesforce Sales application, go to the 'Opportunities' tab.
Click 'New' from any list view in the 'Opportunities' tab if starting from there.
If your organization uses record types, select the appropriate one for your opportunity.
Fill in all required fields, such as the opportunity name, amount, expected close date, type of customer (new or existing), and stage of the opportunity (e.g., Prospecting, Needs Analysis).
Click 'Save' to add the opportunity to your pipeline.
Step 5: Guide Opportunities Through Your Pipeline
With your pipeline humming, it's time to guide your opportunities through each stage.
Need pointers?
1. Assign each opportunity to the appropriate sales rep based on expertise and workload.
Here’s a quick walkthrough:
Open the specific opportunity record.
Look for the 'Owner' field on the opportunity record. This field typically displays the name of the current owner.
Search for and select the team member to whom you want to assign the opportunity. You can do this by typing their name into the search box or selecting from a list of users.
Note: You can also assign an opportunity to a team member while creating one.
To make this easier, you can use Salesforce's assignment rules for automatic assignment. To configure these rules, go to Setup, use the Quick Find box to search for 'Assignment Rules', select 'Opportunity Assignment Rules,' and then create or modify rules to define conditions for automatic assignment.
2. For each pipeline stage, develop a tailored communication plan. This ensures consistent engagement with prospects at every stage.
3. Utilize Salesforce tasks and activities to track interactions with prospects and track progress. But to ensure no opportunity slips through the cracks, you’ll need a capable pipeline management tool like Scratchpad.
4. Keep opportunity information up-to-date. Tools like Scratchpad can streamline this process, allowing quick updates directly into Salesforce.
5. Regularly review key indicators like engagement level, response time, and stage progression to gauge the health of each opportunity and make informed decisions.
Step 6: Analyze and Refine the Pipeline for Peak Performance
To maintain your pipeline’s velocity, you need to constantly optimize it.
You do that through proactive Salesforce pipeline inspection, insightful analysis, and strategic refinement.
Simply put, you must monitor changes in your pipeline to catch shifts in opportunities. This helps in identifying trends and making timely adjustments.
Doing so will also give you valuable insights into how your reps are performing, helping with personalized training.
To do that, you can:
Keep an eye on critical metrics like deal size, stage duration, and win rate. Tracking these metrics provides insights into your sales process's effectiveness and areas for improvement.
Utilize Salesforce dashboard, pipeline reports, and CRM analytics, key features of Salesforce Sales Cloud, to monitor and analyze your sales cycle. But an add-on tool like Scratchpad can take pipeline visibility to another level - letting you monitor forecast changes through graphical charts and track deal movements through advanced grid and Kanban views.
New to pipeline management? Uncover insightful tips on sales pipeline management in our comprehensive guide.
Step 7: Integrate and Automate
Integrating external tools with your Salesforce pipeline brings a world of efficiency, seamlessly connecting your CRM with essential platforms and add-on tools with advanced features.
Each integration acts like a bridge, ensuring smooth data flow and enhanced customer insights.
For instance, integrating Salesforce with Scratchpad can be a game changer for pipeline management. It comes with powerful no-code automations, taking over repetitive tasks like follow-up scheduling, and provides timely reminders for critical changes in deals. The user-friendly automation solution offers a massive leap from the standard features that come with Salesforce Service Cloud.
Step 8: Leverage Forecasting
You've built your pipeline, nurtured opportunities, and refined your approach.
Now, it's time to unlock the ultimate sales superpower: forecasting.
Forecasting in Salesforce isn't just about predicting numbers; it's about actively managing your pipeline based on those predictions.
Here’s how it can help a sales leader or rep:
Identify Potential Risks: An effective forecast process involves thorough deal and pipeline inspection to uncover bottlenecks and potential roadblocks. In order to look ahead, you need to look within first to identify these risks and forecast more accurately.
Track Progress and Performance: Compare forecasted results with actual performance, uncovering areas for improvement and measuring the effectiveness of your sales strategies.
Boost Team Morale and Motivation: Setting achievable, data-driven goals inspires your sales team and fosters a culture of confidence and performance.
Eases Demand Planning: Analyze data and forecasts to anticipate future demand for your products or services, allowing you to optimize inventory, production/development, and marketing, meeting customer needs before they even arise.
That said, Salesforce’s native revenue forecasting can be inadequate for modern business needs, and you might be better off with a dedicated forecasting tool such as Scratchpad.
Next, let’s simplify Salesforce pipeline creation and management further.
From Planning to Execution: The Essential Checklist for Salesforce Pipeline Success
Keeping the Salesforce pipeline in check doesn't have to feel overwhelming for a sales manager. Stay ahead of the curve with this success checklist:
Set Clear Goals: Begin by defining specific objectives for your Salesforce deployment. Align these goals with your business needs and establish key performance indicators (KPIs) to measure success.
Assemble a Team: The strength of your project team is crucial. Build a cross-functional team, identifying stakeholders from sales, marketing, IT, and customer service to ensure a comprehensive approach. Assign clear responsibilities and timelines, tailoring roles to align with sales-specific goals and operational needs.
Evaluate Your Current Workflows: Review your existing workflows and processes before diving into Salesforce. Identify areas for improvement and optimization to support your Salesforce implementation effectively.
Data Migration and Accuracy Check: Ensure the data you transfer to Salesforce is accurate, complete, and up-to-date. Clean the data to eliminate duplicates and errors, then map and transfer it to Salesforce. Post-migration, validate the data to ensure its usefulness.
Training Users for Adoption: Develop a comprehensive training plan addressing the needs of different user groups. Focus on Salesforce-specific functionalities and best practices, employing a mix of training methods like hands-on workshops and webinars. If you develop in-house, your team can leverage Salesforce DX to develop custom solutions and integrations that enhance user experience and functionality.
Testing and Launching: Conduct thorough testing of Salesforce to ensure it meets your business requirements. Identify and resolve any issues before deploying to production. Involve end-users in testing to get their feedback and ensure the system meets their needs.
Tip: Regular updates and maintenance of your Salesforce instance ensure that your sales pipeline remains agile and responsive. A Salesforce instance refers to the specific server or group of servers where a Salesforce organization's data and applications are hosted.
Sure, Salesforce does the basic job of keeping deals organized and flowing. However, sales teams with ambitious revenue growth targets often run into deep waters with Salesforce’s limited functionalities.
Limitations of Salesforce Pipeline Management
Here are some limitations to be aware of:
Poor Integration with External Tools: Salesforce offers standard data management features through its Salesforce Data Pipeline system. However, the CRM sometimes needs help integrating smoothly with external tools (like Google Sheets or note-taking apps) or pulling data into Sales Cloud from an external source — leading to fragmented data and workflow disruptions.
Limited Customizability for Pipeline Stages: A sales manager may find the customizability of pipeline stages in Salesforce limited, restricting the ability to tailor the pipeline to specific business needs.
Inaccurate Forecasts: Clunky Salesforce UI/UX means that reps and sales managers often turn to simpler tools like spreadsheets to record deal data. This can result in data entry errors or incomplete data, leading to misinformed forecasting that can adversely affect the company’s outlook.
Complex Sales Scenario Forecasting: Salesforce has limitations in forecasting complex sales scenarios or non-linear sales processes, which can be critical for advanced sales strategies.
Limited Real-Time Pipeline Visibility: Sales professionals often record deal data in spreadsheets. This leads to limited visibility into real-time changes in the pipeline, which can delay responses and strategic adjustments.
Lack of Contextual Deal Knowledge: Salesforce lacks the depth of contextual knowledge around deals, making it difficult to understand and strategize each opportunity fully.
Thankfully, an advanced tool like Scratchpad can help overcome these limitations.
Streamline Salesforce Pipeline Management With Scratchpad
As we pointed out, Salesforce might leave you wanting for more due to its limited functionalities — especially for pipeline management, deal inspection, automations, and forecasting.
This is where a powerful add-on tool like Scratchpad can be a lifesaver.
What Is Scratchpad?
Scratchpad is a game-changing Chrome extension that supercharges your sales teams and revenue operations.
It equips you with unparalleled visibility into lead behavior, deal forecasts, and sales rep performance so you can spot risks faster, coach smarter, and hit your targets with surgical precision.
Here’s how Scratchpad can help:
Collate and sync all your sales data with Salesforce, even from scattered sources like spreadsheets and external note-taking apps.
Leverage granular roll-up reports to view forecasts across key criteria like territory, product line, and team hierarchy, enabling detailed monitoring and accurate revenue projections.
Boost your pipeline inspection setup with Deal Spotlights, which helps you identify and address potential issues in your deals proactively.
Make Salesforce data management a breeze with Workflow Tiles, offering quick access shortcuts to essential fields, data, and workflows, streamlining your process.